How to fit a glass splashback
Use silicone adhesive to fit undrilled glass. For glass with pre-drilled fixing holes, use the screw fittings supplied with your panel. Unsure which panel you have? Check your order confirmation.
Has your glass got a socket cut-out? Have a qualified electrician remove the faceplate before fitting and refit it afterwards.

The animation could not be opened. Follow the illustrated steps below.
Before you fit the glass
Rest the panel on clean padding. Check the ordered width and height, the way up the artwork goes, and any pre-drilled fixing holes. Inspect the corners and edges for chips or cracks. If the glass is damaged or any detail is wrong, keep it on the padding and contact Vivid before applying adhesive or fitting screws.
Fitting behind a hob? Check your hob’s instructions for the minimum distance to the wall behind it, and keep pans from touching the glass.
Fitting a kitchen splashback with adhesive
Use the adhesive supplied with your order if you have it. If you’re using your own, choose a low-modulus, neutral-cure silicone adhesive suitable for glass splashbacks. Check the label to make sure the adhesive can bond the printed backing to your wall surface. Have a cartridge gun and a finishing tool ready.
-

Check the wall and dry-fit the glass
Start with a flat, sound, clean and dry wall. Before opening the adhesive, hold the glass in place with help if needed. Check that it fits between the cabinets and clears the underside of the extractor, if you have one. If it catches, stop. Toughened glass can shatter if you try to trim or drill it.
-

Apply silicone to the back
Lay the glass face down on clean padding. Leave the silver foil in place. It protects the print and stays on when you fit the glass. With the supplied adhesive, run separate strips from side to side across the back, about 100 mm apart. Stop short of the edges so the silicone can spread without squeezing out. Follow the directions on your tube for the distance from the edge and for any different strip pattern it specifies.
-

Position and support the splashback
With the artwork facing you, rest the bottom edge on the worktop or upstand. Between two cabinets or side walls, centre the glass to leave about 2.5 mm at each side. If there’s an extractor above, the 3 mm gap goes at the top. Press evenly across the face for about 30 seconds. If neither the worktop nor an upstand supports the bottom edge, prop it from below for at least 24 hours and until the adhesive has set. Follow the time on the tube if it needs longer.
-
Seal around the edges
Sealing the edges stops water getting behind the glass and damaging the print. Let the fixing adhesive set for the time shown on the tube. Then use the supplied silicone to seal the edges. If you’re using your own, use a low-modulus, neutral-cure silicone suitable for printed glass splashbacks and kitchen joints. Other sealants can react with the paint or print on the back of the glass. Run a continuous bead around the glass, including the joint along the bottom. Smooth the bead straight away with a finishing tool, before a skin forms. The tube tells you how long you have. Keep the joints dry until the sealant has cured.
How to fit a pre-drilled splashback with screws
Your pre-drilled panel comes with screws and chrome caps. The standard hole centre is 25 mm in from each of the two edges that meet at the corner. If you need the holes in different positions, contact us before ordering so we can arrange it before the glass is toughened.
How heavy is the glass? For 6 mm glass, allow about 15 kg per square metre. A 600 × 750 mm panel weighs about 7 kg, and a 900 × 750 mm panel weighs about 10 kg. Choose wall fixings suited to your wall and the weight of your panel.
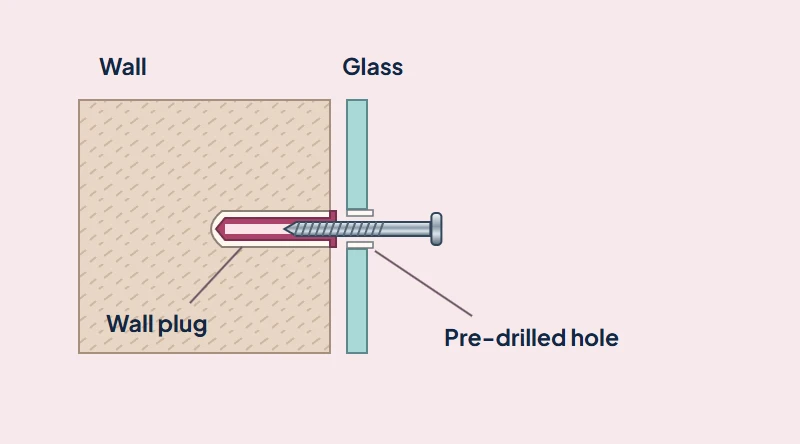
The animation could not be opened. Follow the steps below.
- Mark the wall. Support your panel in its final position and pencil a mark on the wall through the centre of each actual hole. Lift the glass away and rest it on padding.
- Prepare the fixings. Check each mark with a suitable pipe and cable detector. If you’re unsure what runs behind the wall, have an installer check before drilling. With the glass safely aside, drill the wall using the bit and fixings specified for your wall type and panel weight. Fit the plugs where required.
- Fit the screws by hand. Support the panel and line up the holes. Start every screw loosely, then tighten evenly with a hand screwdriver until the panel is secure. Avoid overtightening or letting bare metal press against the glass.
- Finish with the caps. Once the glass is secure, fit the decorative caps by hand. Seal the exposed joints with a low-modulus, neutral-cure silicone suitable for printed glass splashbacks and kitchen joints. Other sealants can react with the printed backing. Let the silicone cure before getting it wet.
Glass splashback fitting FAQs
Can I fit a glass splashback over existing tiles?
The tiles must be flat, clean, dry and firmly bonded. Check that your adhesive is suitable for both the printed backing and the tile finish, especially a glazed surface. Fix any loose tiles first. If you’re unsure about the surface, ask Vivid before bonding.
How soon can I fit it on fresh plaster or paint?
Wait until the plaster has dried throughout and any paint has cured for the time specified by its manufacturer. Check the adhesive instructions for surface preparation and whether your wall needs a primer. A surface that still feels damp, dusty or flaky needs attention before fitting.
Can I use the same silicone for fixing and sealing?
Yes. The silicone supplied by Vivid can both fix the glass and seal the edges. If you’re using your own, choose a low-modulus, neutral-cure silicone adhesive suitable for glass splashbacks. Check the tube says it’s suitable for both bonding the printed backing to your wall and sealing exposed kitchen joints.
How long should I wait before sealing or cleaning?
Use the curing instructions on the fixing adhesive to decide when to seal. Once you’ve sealed the edges, follow the sealant’s own cure time before getting the joints wet. A bead can feel dry on the surface while it is still curing underneath.
How do I clean my glass splashback?
Once the sealant has cured, use a non-abrasive glass cleaner and a soft, lint-free cloth. Never use a metal scraper on the glass, including a hob scraper. The blade can scratch the surface.
What if the glass touches a cabinet during the dry fit?
Lift the glass away and recheck the opening and finished panel dimensions. If the panel binds, contact Vivid before applying adhesive.